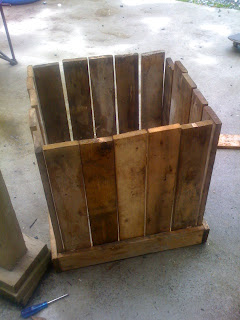
Have you ever just seen a pile of wood, and thought "Hey, what can I get out of that?" I do it often! This time I put those thoughts into action! This is what I came up with:
Total cost: about $10
Total time: 8 hours (because I started out not know what I was going to build exactly;)
Difficulty: Medium
Tools required: drill, jig saw, tape measure, pencil 2 inch screws, 1 1/4 inch screws, poly for liner, paint and brush, wood of choice, hammer, stapler and staples for wood
So, first of all, the pile of wood is an old burn pile in the back yard that has come from house building scraps. A family friend brings them over to the house and it is usually used for the fire pit, but thought I would do something else with it this time. There were a lot of boards that were about the 2 feet length that had been cut from different projects for the house building. The first thing I did was build a basic frame. I had originally built a salad box and that is what I was starting to build when the idea came to me that I could expand this project!
Luckily for me the pieces were all generally the same size, so it was pretty easy to put this together. I used 1 1/4 inch screws to pop this together.
Next I built the salad box. I have one of these in my garden specifically for lettuce mixes. It is 3 inches tall, so perfect for baby salad greens!
Once I had the box together, I had to figure out how to do the sides. It all started to come together by this point, and decided that I really loved the look of vertical sides and horizontal bottom and top.
I didn't plan it very well,, so it was a little bit tough getting it together at first, simply because I jumped ahead of myself. Should have put the walls together first and then connected them. What ever you are comfortable with will work though! I used a chair for the top pieces to lean on as I was screwing those pieces in. For this section I also used 1 1/4 inch screws.
As I looked at the box, this is what I thought would be the bottom and then figure out something with the top. It didn't actually end up like that. This is when I decided to use the salad box as the bottom, and ended up flipping the box. Because the pieces are all the same length it slid in quite easily. I did have to find some pieces for support on the inside of the box, and they had to be screwed to the sides so it would sturdy up.
It has been fit, and snug on the bottom. Now for the top. This is where I had to use the jig saw. I had to measure 45 degree angles on the boards on top so the pieces would fit together and it would have a sharp looking top. I stapled the edges together, and used that metal stuff for securing furniture to the wall (in case of earth quake) I stapled the wire on and hammered it in so it was secure. The top side I just used staples for some extra strength. I wasn't very concerned with using screws on top as it was going to be painted so screwed the top on, two on each corner where the pieces connected for some more extra support. This is where I used the 2 inch screws so they were long enough to get some good grip into the frame boards.
Now that it was pretty much put together, I cut poly to fit inside so the wood won't rot away too quickly. You could put a pot inside as well if that is easier for you. This wood was used for concrete so I had to scrape a little bit off before painting, but all in all it didn't take very long, and was a pretty easy, fun project! I bought paint for this project, but am also using it on another one, so total cost for the paint was 14.00, but this box used about 1/4 of it. The screws were about 3.00, and the other miscellaneous parts were already kicking around the house like staples and poly.
Have fun, stay safe and please use safety gear when ever it is needed!


No comments:
Post a Comment