
Sunday, November 27, 2011
Home
Sunday, September 18, 2011
Homemade Pizza
Now that fall is here it gets darker earlier, and the kids seem to be getting hungry earlier. School is back in, routines are starting to settle, sports are taking up a huge part of our afternoons but Sunday is our family day. Today we decided to do homemade pizzas and OH MY GOSH. Great idea!! DH told me about this program I can put on my phone filled with recipes so I did that and found quite a simple recipe, but we played it up. To make the dough was quite simple and we had enough to make two pizzas, one for the kids, and one for us. The kids are notorious for having the same thing over and over, so we sneak in this and that to see what they say, and most of the time they have no idea that we have snuck in some veggie goodness. We didn't add much to theirs today, but you can get away with quite a bit if you have a grater and a little bit of patience. We try to stick to thin crusts as much as possible, but we do end up loading veggies to our pizzas. And I mean lots! Today was exempt from what I usually do, broccoli, salad mix, carrots even! Anything you can think of. Kids like pizza. You can put a lot of things on pizza. Then kids will eat their veggies!! Mine still pick off onions for some reason, but they will eat just about anything else on a pizza! 


The kids are simple at their age, so of course, so is their pizza. They are pepperoni and feta fans, so of course that is what we made. Their extra veg sneak was some extra tomatoes in their sauce, and fresh herbs from the garden infused into the dough.
First I will give the recipe for the dough and instructions. It is easy to make, quick, and the kids can get involved. 4 easy ingredients, and an hour and a half of your time, and voila! A happy bunch of full men in a house makes for a fantastic, quiet evening. This is our first attempt and it turned out better then we could have imagined.
Ingredients:
1 cup of warm water
1 envelope of actie dry yeast (I used 2 teaspoons out of a jar of yeast)
3 1/4 cup unbleached all-purpose flour
1/2 teaspoon salt
Herbs of choice (We used fresh out of our garden, basil, spicy oregano, organic no salt spices)
Directions:
Sprinkle the yeast into the water and gently stir until dissolved. It should be smooth and a beige coloured mixture. (This picture was for a different recipe but the mixture of yeast should look like what is in the measuring cup. It will be kind of "frothy" and bubble up above the water)

If it does not get frothy then it is probably a "dead' batch. You will have to make sure it bubbles up or it won't work to rise in your dough. Once it is mixed put it in a warm spot for about 5 minutes so it can do it's thing. Don't use boiling water as it will kill the yeast, I usually just use warm tap water, just before it would be hot.
After you have started your yeast mixture put 3 cups of the flour and all the salt in a big mixing bowl and mix it together. Make a well in the center of the flour and pour in your yeast mixture. Stir it from the middle with a wooden spoon mixing in the flour from the sides until it becomes a soft dough. You can use your hands if it is too hard to do with the spoon.
Once you have a dough take the ball and place it onto a floured surface. Dust up your hands with the flour and knead away. Gradually add the rest of the flour until your ball is no longer sticky, about 5 minutes. Knead your dough picking up any little pieces that are there and adding them into the ball until it is smooth, and elastic. Only knead your ball until it is springy. This is where we made it more fun! We added in fresh basil, spicy oregano and that magic no salt organic herb mix from Costco. All together it was about 1/4 cup of herbs. You can get as creative as you want, so experiment!!

Shape the dough into a nice bowl and put into a clean warm bowl covered tightly somewhere where there are no drafts. Let sit for about 1to 1-1/2 hours, until it has doubled in size. Once it has doubled "punch" it down to remove all the air bubbles. Shape into a ball once more time and let sit for 10 minutes to rest. Once rested roll out the pizza dough and cover with your favorite toppings! You can bake on a pizza pan, or cookie sheet. We inherited a pizza stone so gave that a try, and honestly, I will only use that from now on. The crust turned out fantastic. This dough will make 2 pizzas, which was enough for our 4 family members, with some left over for lunches tomorrow. We baked at 375 for about 25 minutes.
Use the dough up within 2 hours, or wrap tightly and freeze up to 4 months.
This photo is the before of the chicken pizza. We used red pepper Alfredo sauce, spinach, artichoke hearts, chicken breast cooked earlier, feta, olives, sun-dried tomatoes and jalapeno havarti. To put an extra jump we stuffed the crust with Havarti. It was sooo good.

All chicken goodness came out of this!

As you saw up at the top, the first photo was the pepperoni before we put it in the oven. This is the finished pizza. We used tomato sauce, I find that they like spaghetti sauce more then actual pizza sauce. It has more flavour to it, and they don't complain. Often we let them choose the flavours and then there is no fight :) It was simply sliced pepperoni and feta with cheddar on top and cheddar stuff into their crust.

The stuffed crusts probably aren't the healthiest, but sometimes you just need that comfort food to warm you up on a cold day. We already have the fire going so this was just another welcoming of my favorite part of the year! There is so much yummy goodness this time of year, recipes will be flying.
If you're feeling really energetic you could cut this dough up into small sections and make mini pizzas that can be frozen for easy access later on. This would probably make 10-12 mini pizzas for us. We are definitely going to give that a try next time!
The difficulty of this recipe is easy. Fun for the kids, so get them involved! Just make sure they wash their hands ;)
Time 1.5 hours from start to finish, but most of it is waiting for the dough to rise.
Tools:
Wooden spoon
Wooden spoon
Measuring cups
Bowl
Pizza pan or cookie sheet
Friday, August 26, 2011
Yeast free cinnamon buns. Need I say more?

This last year has been quite a year with back injury etc and someone asked how I could be a size 6 now and eat what I eat. I think my baby sister said it the best.. "The trick to being a size 6 is doing everything that is good for the soul. And nothing that is bad for the soul" Now, don't get me wrong, I still have my sins, like a whole bag of wine gums every now and then.. not the little one. I'm talking the big Costco size bag. That has become fewer and far between, but you get the picture.
One thing we avoid at all costs is margarine. We've stopped using it completely, and I cringe at having to use it. It isn't whole, it is full of weird things, and if my body has to work that hard at processing it, then we don't need it!We won't absorb any of the good, because our bodies are working so hard to get out the bad. Butter, butter, butter!! You don't have to use as much, and when you do use it, it's like a treat. Now, that is something pure and good, and my soul appreciates it, to the fullest.
I had a baking day the other day, and went crazy, banana cookies (delicious), banana coconut bread, and these little morsels. This was my first time making cinnamon buns that didn't pop out of a can, and they were actually so simple to do, and took under an hour from start to finish!
All you need:
DOUGH
2 cups flour
2 Tbl sugar
4 tsp baking powder
1 tsp salt
3 Tbl butter
3/4 cup milk (we used 1% with this, because we did plan on eating them all. Which we did ha ha!!)
FILLING
4 Tbl butter
1 cup brown sugar (you can use more or less)
3 tsp cinnamon
Nuts, raisins, etc to taste
GLAZE
1/2 powdered sugar/icing sugar
1/4 cup milk
What to do:
1. Preheat oven to 425F (250C)
2. Mix flour, sugar, salt, and baking powder in a large bowl
3. Cut in butter until the mixture looks like oatmeal or small peas
4. Add milk gradually, stirring with a fork. Dough should come away from sides of bowl
5. Knead 3-4 times and then roll into a rectangle 1 cm thick on the counter, lightly floured
FILLING
6. Smear butter over dough, coating it. I melted the butter down so it would spread easier.
7. Sprinkle your cinnamon on top, to taste
8. Sprinkle brown sugar on top
9. Sprinkle your nuts, raisins, extra filling on top that you choose
10. Roll the dough up from one long side to the other
11. Slice into 1-1.5 inch slices and place cut side down in a greased muffin tin or cookie sheet
12 Bake 12-15 minutes or until golden brown
13. Drizzle topping on after they have come out of the oven. Enjoy!
These were really good, the kids and hubby ate them all while they were still warm! Make sure the kids get their hands in this job too, it's a lot of fun, simple to make, and easy to clean up.
Thursday, August 11, 2011
When you're hungry and you know it... French Toast

Sometimes the kids can be a little picky. okay,.. actually A LOT of times the kids can be picky. You know those days, and there isn't much in the fridge? This one is easy and doesn't take up a lot of time, and of course, the kids will eat it!
French toast is one of those things that you forget about but when you remember that you have the ingredients, it makes morning a lot more fun, and everyone thinks you've slaved your heart out over this meal! The end result is the best result. Usually with full belly's, smiles, and maybe even a hug from the one who doesn't do that anymore due to age ;)
All you need:
Bread either fresh or frozen (we don't eat a lot of bread but we always have some in the freezer. We go with a whole grain/12 grain, or something high in fiber)
Eggs
Cinnamon
Optional:
Sugar or Syrup
Fruit (fresh or frozen)
Whip cream or frozen yogurt (In this recipe I used frozen french vanilla yogurt, with frozen berries and mango that I warmed up on the stove while I was preparing the other stuff)
Directions: So simple!!!
Put a non stick pan onto medium low to warm up. You can butter or oil your pan lightly if your eggs stick to the pan.
Crack eggs into a bowl, and whip/scramble. Add cinnamon while whipping with a fork.
Place bread in egg mix and coat both sides of the bread. Place your coated bread into the pan and cook until the egg mixture has cooked thoroughly on either side. You can put the french toast in the oven on low if you are cooking a whole bunch of pieces for a large group!
Once you have finished with the toast, place on your plates, add your whip cream or frozen yogurt, and top with berries or syrup! You can also sprinkle powdered sugar on top. It looks beautiful with blueberry/raspberry mix.
I usually cook for 3-4 people so it takes about 15 minutes for everything to be finished. Usually by the time I've cleared stuff off the counters the kids have finished their meals, and that is when you can snag your hugs!!!
This recipe is an easy one, and you can get the kids to help. They love to help in the kitchen, and this way they learn, and maybe one day you will get a surprise breakfast made for you ;) Happy eating, and enjoy!
Saturday, July 9, 2011
Kitty Loves Pillows!
We recently got a kitten and he is full of energy and loves to get into stuff, but when he is sleepy he quite enjoys being up high, on our pillows in bed, or on top of the couch. I figured why not make him a pillow for himself!

I purchased the fabric at a second hand store for $1.00 and it was just over a meter of blue with darker blue pinstripes. Perfect for a little boy!

I cut the fabric about two feet by two and a half feet. After cutting it folded it in half so the total pillow is about 2.5 feet by 1 foot so it can lay comfortably across the back of the couch. I folded the nice side in and did a quick stitch almost all the way around but enough to put my hand through and pull out the inside once sewed up so that it could be filled with stuffing. The pillow didn't need a lot, just about 2-3 inches tall. I am in the process of other pillows so have quite a bit of stuffing bags here and there. You can always take apart an ugly couch pillow that just is cutting it for you and use whats in there. Then once stuffed I did a quick stitch to sew the hole up and voila! This project only took about one hour from start to finish. If you had a sewing machine it could possibly only take about 10 minutes. It was quite easy and could be a fun project to cure some boredom during a rainy day. We don't know how big our little "Jupiter" is going to be so I made the pillow quite long. It will hopefully be great for him, and a lot easier for us to deal with a pillow instead of fluffy hair stuck in the couch come shedding season! Hope you all get some kitty love! Nothing beats a purring kitty on your lap.. :)
Cost including stuffing - 3$
Difficulty - Easy
Needed - Fabric, Sewing needle, thread, stuffing, scissors
Thursday, July 7, 2011
Out with the old, in with..... the old?
Ever wonder what to do with that old painting, or dull old mirror that just doesn't look "good" anymore? One of my favorite things to do is to make the old look new again. I have a couple of little finds that have been spiffy'd up that will now be used as new pieces in the new house! I was given some old paintings and frames from a family member that just seemed blah, and had no life left in them, very "80's" even possibly. Yes, I know the 80's are making a come back, and YES I *love* some of the 80's things.. (like bangles, and some odds and ends.. but not the acid wash, that can stay back there ;) and there are definitely some lovely art pieces that are from back then, but this one just wasn't doing it for me!

I forgot to take a photo of it in it's completely original state, but you get the picture. The frame was wood, with gold and then a canvas middle, that is a very common theme for canvas. I did see a lot of that working in a framing department for a little while, but just wasn't for me. So an easy fix up, probably one of the easiest for me! I ended up popping out the canvas and painting the frame black. Black is contemporary, and usually goes with everything! I painted the canvas over so it was white, and then just played with some colours! That style usually isn't what I do.. more of a tole paint kind of gal, but you can do whatever you want! A lot of times at the second hand stores, these types of paintings are dirt cheap (usually under 5$) so you are really saving a bundle! It is completely up to you what you want to do, and how to use your imagination! Anyway, this is what I came up with, and my husband seems to love it! So, to the living room it will go :)

For my second find, which is completely amazing that *anyone* would be throwing this away, is the new mirror.

We have been looking for a large mirror for quite some time, and yes they are easy to come by, but all the ones that I came across in the last few months were either unframed, or had some sort of "fake" wood around them, or that weird plastic stuff with the punched in designs. Luckily enough I came across this wonderful find, the only thing that I didn't like was that it was brown. For 10$, I gave myself a huge pat on the back! This will also be going in the living room to help make it "look" bigger. (isn't that silly? Haven't even moved, and I've already got the whole house furnished.. dh thinks I've gone loony for sure ha ha ha!! we move in less then a month now, so I should probably not be getting any more furnishings until we have finished, but with this I just couldn't help it!) The whole project cost me hardly anything.. you can purchase black acrylic paint at any craft store, or even the dollar store. I do prefer the americana as it doesn't seem to peel off, and luckily the paint that was already on the mirror was acrylic so it will stay on just fine. It hardly used any paint so you will be lucky enough to have some extra kicking around for another project on a rainy day!
Total cost of both projects = 9.99
Tools - Paintbrush, glue (to glue canvas back into the frame, you can use finishing nails if that is easier for you)
Black paint ($1, at the dollar store, or about $3 at the craft store)
Difficulty- Easy (this is also something you can get children to help with if you wanted, the paint is safe for kids, so it can become a family affair. Be warned, messes WILL occur, but that is the fun part ;)
Cheers, and happy spiffy'ing up that new old item!
Thursday, June 30, 2011
Once upon a time, you were a boring old basket!
When I see things, I don't look at them usually for what they are.. my dear hubby thinks I've gone whacky because *everything* I look at that has some sort of well in it, I see a plant of some sort that should be in it. I can't help it! It's just this thing that happens to me! So, here I will post a couple of items that I have in the garden! It may be crazy of me, but I think that's okay. The strawberries in boots, or the pansies in an old tool box suit me just fine! Gardening is for the imagination, and whatever you see fit usually does the trick! Please take a look, and I hope that you find an idea for yourself. It really is amazing what these little green things will do for us, and all the ask for is a bit of sunshine, a bit of water, and somewhere to lay their "heads", and then we are gifted what they do best! Berries, flowers, fruits and vegetables. How wonderful!! :)
These are the pansies in their wooden toolbox. Because it is shallow it needs to be watered a little more often then the other plants, but totally worth it for the look it has

We started these bunching onions at the beginning of the season, and because we didn't have any starter pots left, I zipped the top of a cranberry juice jug off! It works great!

Next one, we had an old pair of boots kicking around, they were too worn to wear, but not too worn for some strawberry plants ;)

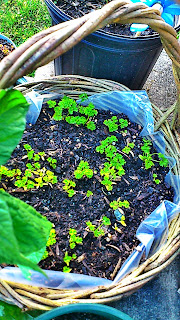
For some reason everyone always has a basket or two kicking around and have no idea what to do with them.. they are either too big, or too small for anything useful, and end up sitting in a closet or corner collecting dust. I've found them to be the perfect thing for herbs. They are bio degradable, so after a few seasons they will most likely be unable to pick up, but you can always put little feet on them so they last longer. When doing the baskets I will put a liner inside of some sort, plastic wrap that I will re use, or that weed netting, just so the dirt doesn't wash out. Then poke a hole somewhere on the bottom so the extra water drains out. Plant any plants you wish! Here I've got some catnip and parsley in these baskets.

 The next few pictures are just a couple more ideas. There is an ice cream bucket with a red maple, wash bin full of lilies, a tin bucket with some sort of grass or lily I found in the compost pile, which I will find out what it truly is next spring, and a banana wire basket lined with foil paper from the outside of a pot filled with black clover (full of four leaf lucky clovers YAHOO!!,) and another pink flower that spreads on the ground. If you use your imagination you can grow anything just about anywhere!! Happy gardening!!


These are the pansies in their wooden toolbox. Because it is shallow it needs to be watered a little more often then the other plants, but totally worth it for the look it has

We started these bunching onions at the beginning of the season, and because we didn't have any starter pots left, I zipped the top of a cranberry juice jug off! It works great!

Next one, we had an old pair of boots kicking around, they were too worn to wear, but not too worn for some strawberry plants ;)

For some reason everyone always has a basket or two kicking around and have no idea what to do with them.. they are either too big, or too small for anything useful, and end up sitting in a closet or corner collecting dust. I've found them to be the perfect thing for herbs. They are bio degradable, so after a few seasons they will most likely be unable to pick up, but you can always put little feet on them so they last longer. When doing the baskets I will put a liner inside of some sort, plastic wrap that I will re use, or that weed netting, just so the dirt doesn't wash out. Then poke a hole somewhere on the bottom so the extra water drains out. Plant any plants you wish! Here I've got some catnip and parsley in these baskets.


Subscribe to:
Posts (Atom)